
COLIBRI Studio
The COLIBRI Development Environment for the design of Case-Based Reasoning Systems
Windows 64 bits download Linux 64 bits downloadAbout COLIBRI Studio
COLIBRI Studio is the implementation of the top layer of the COLIBRI platform. It provides the visual builder tools required to generate CBR systems without dealing directly with the source code. It is built on top of the jCOLIBRI framework and enables the composition of its CBR components. COLIBRI Studio is integrated into the popular Eclipse IDE. This way it takes advantage of the facilities provided to manage projects and Java source code. It enables the generation of "CBR projects" where required libraries are automatically configured. COLIBRI Studio uses jCOLIBRI 2.3. It is the version used to compile and run the source code generated by the tools in COLIBRI Studio.
The main feature of the development process proposed in COLIBRI is reuse (somehow inherent in a CBR framework). We propose the reuse of both system designs and their components. The platform provides a catalog of already implemented CBR systems and lets users select the most suitable system and adapt it to the concrete requirements of the target application. It is a kind of CBR process for developing CBR systems (See this paper for details).
It is natural to think that pre-designed systems should be generated by "expert" users. This is the first role in our development process: expert users are mainly concerned in designing new CBR applications. These designs are called templates in our platform. A template is a high level representation of a CBR system where several tasks are linked together to define the desired behaviour.
In a general way, the templates of the jCOLIBRI library are composed of tasks that identify the steps of the CBR system. A system (or executable template) is a template where each task is solved by a component. Our design tool retrieves templates from the catalog and lets users adapt them to create new CBR systems.
Here the actors are not only CBR experts: developers, teachers, students, or inexperienced researchers will perform this process. This main use case is referred to as the Template Base Design (TBD) which consists mainly of retrieving a template and selecting a suitable component that implements the behaviour dictated by each task in that template.
To aid users in the retrieval of a template that fits her requirements we have developed an Eclipse's wizard that implements a recommender system of templates. This recommender follows an approach named "retrieval by trying" where templates are associated to a real implementation that lets users test the behaviour of the CBR system once implemented (in a testbed domain).
To configure the templates by selecting a suitable component for each task, COLIBRI Studio provides, the system editor tool. This tool implements the TBD itself by enabling the configuration of templates with components available in the jCOLIBRI framework. On the left side it displays the internal variables used to configure the data-flow between components. On the bottom side the tool reports the errors found in the composition being created by the user (unassigned inputs or outputs, incompatible assignations, etc.). Once the composition has no errors it generates the source code of the application, that can be directly compiled and executed.
Here an important issue arises: how do we know what tasks a component can solve? In other words, we have to link the methods in the bottom layer of the COLIBRI platform -the jCOLIBRI framework- with the tools in the top layer. To address this issue we have developed an approach based on Annotations. Annotations represent meta-information in the source code and allow us to document classes, methods or even variables. Then there are several ways to process and extract this information. The most popular example of annotations is the JavaDoc tool, which generates HTML documentation of the source code from simple tags. jCOLIBRI 2.3 uses this mechanism to annotate every component with information about its behaviour. That is the only difference between jCOLIBRI v2.1 and v2.3. In this way, composition tools can automatically analyse the source code and obtain the components able to solve a concrete task.
The design of these components is very related to the research field as they will implement the different algorithms developed by researchers. Therefore, this is the second main task of expert researchers. However, we don't expect that expert researchers will implement the components. This task will be delegated to users in a "developer" role. We also contemplate the role of "junior researcher" that could design and even implement his own experimental components. Then, these components could be shared to the community by means of the COLIBRI platform.
The main advantage of the TBD process is that it provides an easy to use experimental environment to test new designs and components. This feature is also very interesting for teaching. Lecturers can use our tools to prepare assignments with existing (or even new templates) and let students configure different systems and evaluate their performance.
Up to now we have left aside the non-academic uses of the platform. As we will see in the following sections, the TBD tools let users generate automatically most of the code that implements their CBR application. Therefore, it could be used by development teams in commercial companies to increase their productivity when generating such systems. Here, experienced (head) developers will have a similar role to expert researchers, and they will be in charge of supervising the implementation of the required components, which will be performed by regular developers.
Summarizing, the COLIBRI Development Process consists of:
- Expert users design new templates that define the behaviour of a CBR system by means of tasks.
- Users are able to find and retrieve the most suitable template according to the prerequisites of the CBR application they wish to build.
- Users configure the retrieved template by selecting the components that provide the behaviour required by each task in the template.
- Once the configuration is completed our graphical environment generates the source code of the application.
- Complementary tools let users compile, execute and evaluate the generated application.
- The components required to instantiate the templates are generated by developers.
Documentation
Once COLIBRI Studio is installed, the COLIBRI perspective organizes all the provided tools. Commonly, the first action consists of creating a new CBR Project by means of the New CBR Project Wizards. Then, the tools in the perspective can be used to modify the configuration and generate the source code of your application. There are three wizards accessible through the New menu:
- Option 1: Select File >> New.
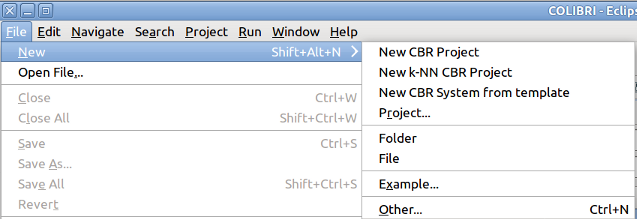
or - Option 2: Select the new icon.
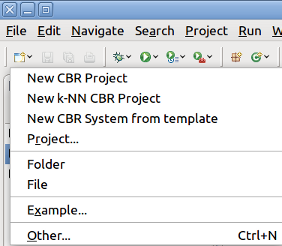
Wizard New CBR Project Wizard
This wizard let's you create an empty CBR Project or choose which elements of you want to configure with the wizard.
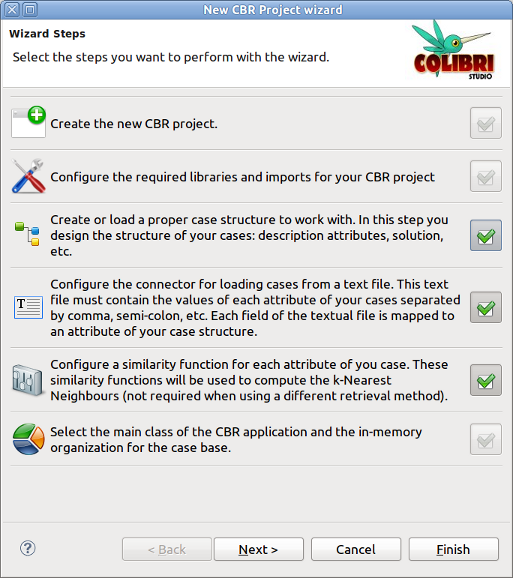
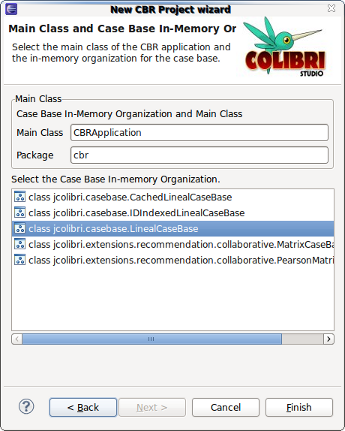
At least you have to perform two steps: (1) create a new project and configure extra required libraries (if any) through the Eclipse standard wizard, and (2) choose the package and name of the java class that will implement your CBR system and select an in-memory organization of your case base:
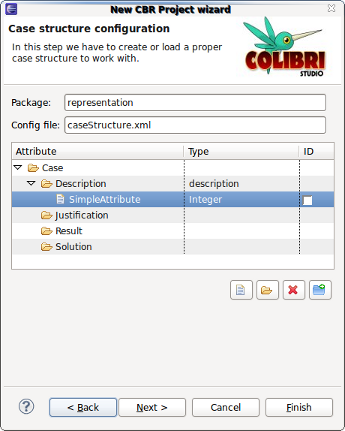
Optionally, you can define the case structure, configure the similarity measures and define the persistence of your cases:
Once finished, the package explorer will show the generated project. A java file with an empty skeleton of a CBR application will be automatically created and opened in an editor. Its content is the typical instantiation of the CBRApplication interface of the jCOLIBRI framework (you may need to read the jCOLIBRI tutorial to understand that code). Here you can program directly or use the System Editor tool to generate the source code of your application by retrieving and adapting a template.
Wizard New k-NN CBR Project
This wizard generates a complete k Nearest Neighbours system. Users must configure the case structure, similarity and persistence and the wizard generates a fully functional system. The configuration is performed by means of the dialogs used in the previous wizard.
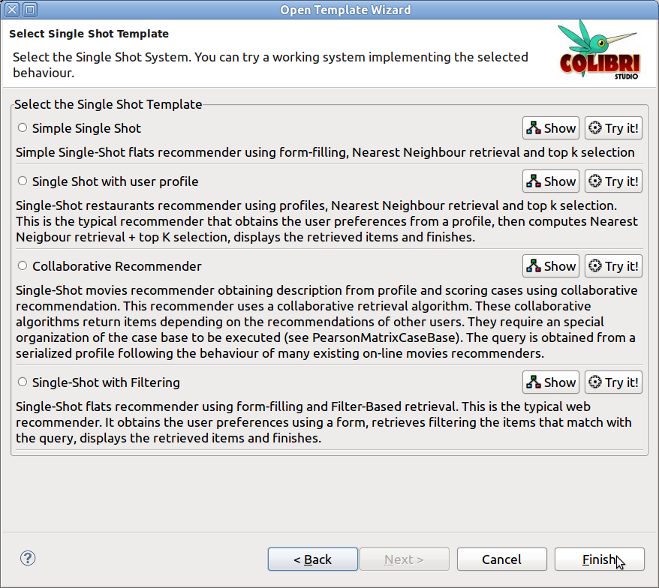
Wizard New CBR System from template
This wizard creates a new CBR Project and lets users select a template from the catalog that will be adapted to generate the CBR system. Once the project is configured, the wizard asks for the type (family) of CBR system to generate. Next, a recommender proposes templates that are associated to a real implementation and a screenshot. This way users can test the behaviour of the CBR system once implemented (in a testbed domain). By clicking on the Try it! you can try the behaviour of the selected template.
When the template has been selected, the wizard lets users decide the level of adaptation to be performed:
- Open the configured template. This option opens the template configured with the methods that implement the behavior shown in the previous step. This way, adaptation consists on changing desired methods and adjust the parameters.
- Open the original template. It opens the template without any kind of configuration. The tasks conforming the template are displayed and the user is in charge of assigning and configuring a method for each one.

After this last step, the wizard is closed and the System Editor tool will open the selected template.
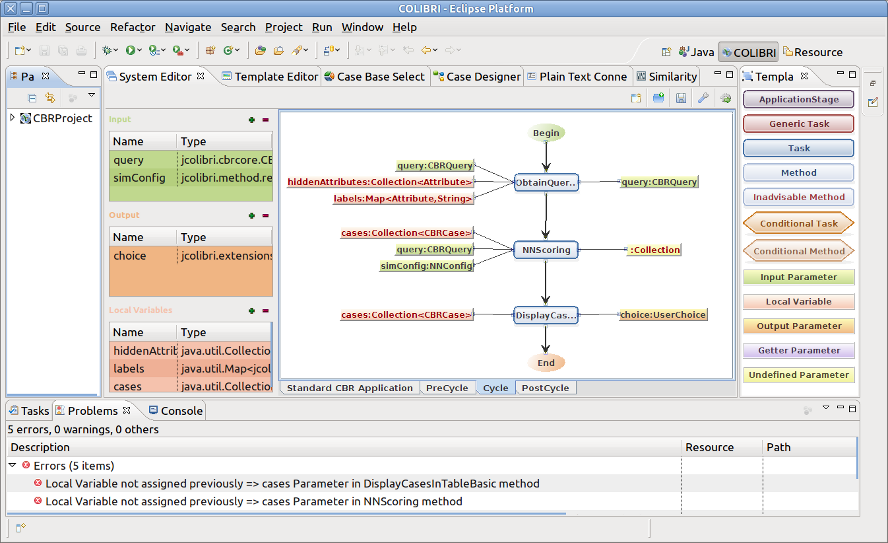
System Editor
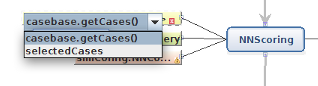
The System Editor tool allows to adapt a retrieved template by selecting the components that solve each task. The Standard CBR Application tab shows the global structure of a CBR system in jCOLIBRI. Actually, it represents the methods of the StandardCBRApplication interface. On the left side, three panels represent the variables that connect the inputs and outputs of each component. Inputs are drawn on the left side of component and outputs on the right side.
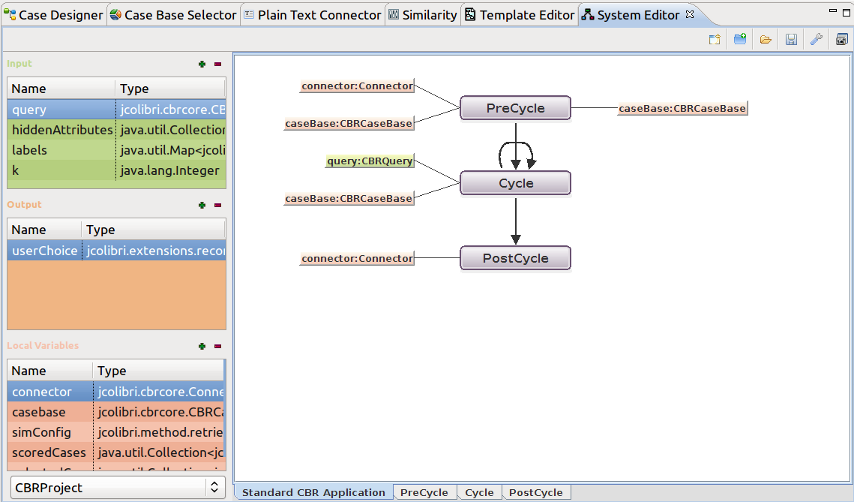
These variables can be defined as:
- Input. Represents an input of the CBR system. The generated source code will include a setter method for each input variable. They are used to configure the CBR system.
- Local Variable. Are local and private variables of the CBR system. The cannot be accessed externally.
- Output. Represents an output of the CBR system. The generated source code will include a getter method for each output variable. They are used to return the result of the reasoning process.
The preCycle, cycle and postCycle tabs contain the subtemplate associated to every stage of a CBR system in jCOLIBRI. Users must configure every subtemplate by chosing a suitable component for every task. Once the template is complete the tool can generate automatically the source code of the CBR system. The panel on the right side of the window describes the meaning of every element that can appear in a template. The System Editor checks the templates to ensure they are correctlly configured. Errors and warnings found will be displayed in the Problems panel.
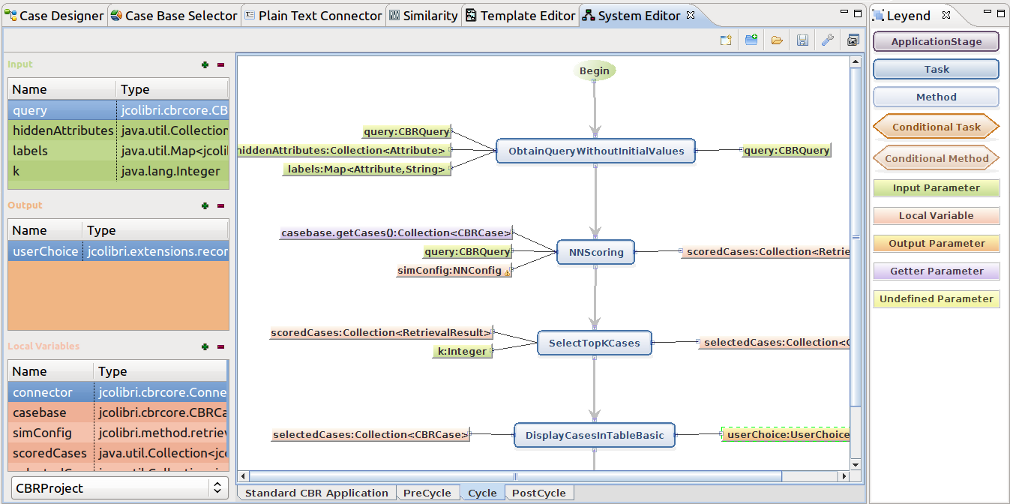
Variables are defined with a name and a java type. They can be created automatically from the template, right-clicking on an unassigned variable.

Every input or output must be assigned to an existing variable. Unassigned parameters will cause an error entry the Problems View located in the bottom side of the window.
Existing variables can be assigned to inputs or outputs by clicking on the parameter. A list of compatible variables will be shown. The compatibility is checked according to the java classes hierarchy. Moreover, the getter methods of every variable are also displayed.
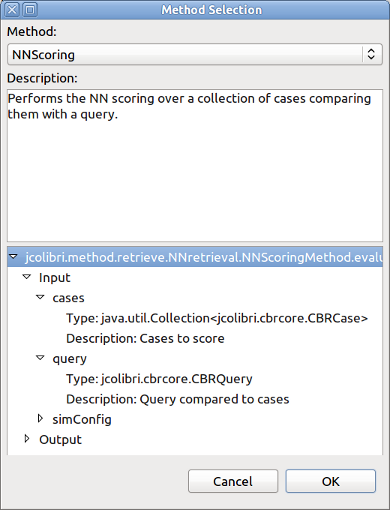
The component used to solve each task can be changed by double-clicking on the task. A dialog will show the components able to solve the task. It displays the description and structure of the component. Note that these components are automatically obtained by analysing the annotations in jCOLIBRI or the CBR Project.
The buttons bar includes the following actions:

- Open a template with the recommendation wizard.
- Open an template located in the project as a system. This template has to be generated with the Template Editor tool.
- Open an existing system from the project.
- Save the system. Systems are saved in the project in a folder called "templates".
- Generate the source code. This is the most important action. It generates the source code of the application according to the configured system.
- Generate a screenshot of the template.
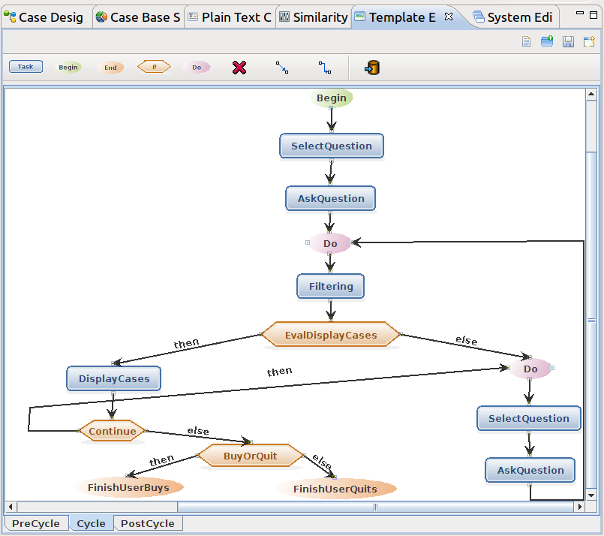
Template Editor
This tool should be only used by expert users that want to define a new template. These templates can be later configured with the system editor.
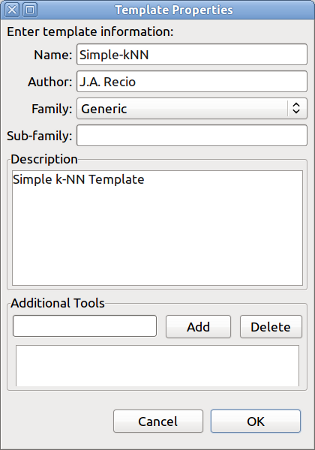
Templates can be created, loaded and stored in the project. When creating a template, some metadata is required, like the author, description or family of the system (generic, textual, recommender, etc).
The upper buttons bar contains the different elements that can be inserted into a template. By default, standard tasks can be chosen, although new tasks can be defined with the last button.
Case Designer
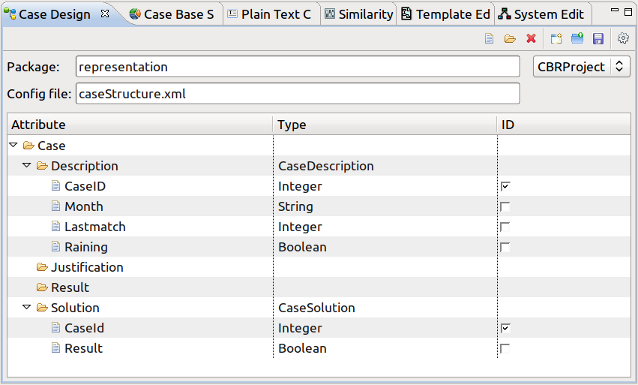
The Case Designer tool is used to define the structure of the cases. In jCOLIBRI cases contain a Description, Solution, Result and Justification components. Each component is composed of several attributes, that can be also simple or compound. Each component or compound attribute corresponds to a Java Bean that contains the defined simple attributes with their corresponding getter and setter methods. Therefore a simple attribute is defined by its name and its java type. One simple attribute of each component must be defined as an ID. These ID attributes are used by the persistence connector to represent primary keys.
The button bar allows to create a new case structure, load and save it from/to an xml file, and generate the corresponding java beans.
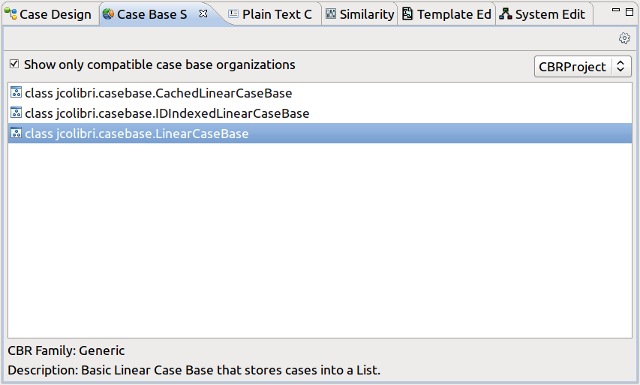
Case Base Selector
Configures the in-memory organization of the case-base. Once the case base organization is selected, the tool can generate the source code that configures it.
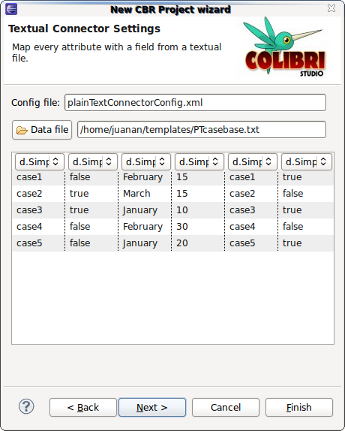
Plain Text connector
Configures the Plain Text Connector by selecting a text file containing the cases. Each line defines a case and attributes are separated by a specific character. The tool allows to select the file, define the separator and map every column with an attribute of the case (defined in the Case Designer tool).
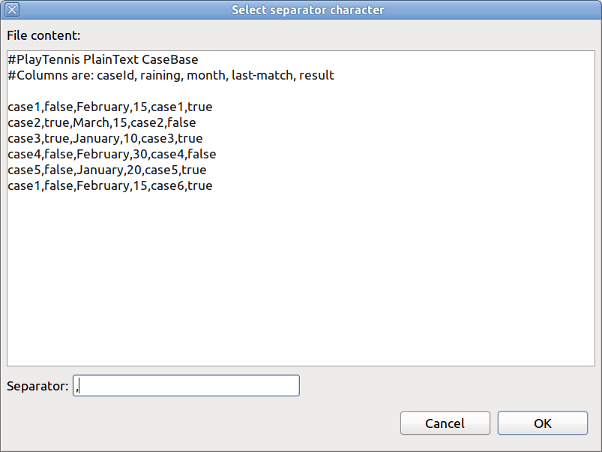
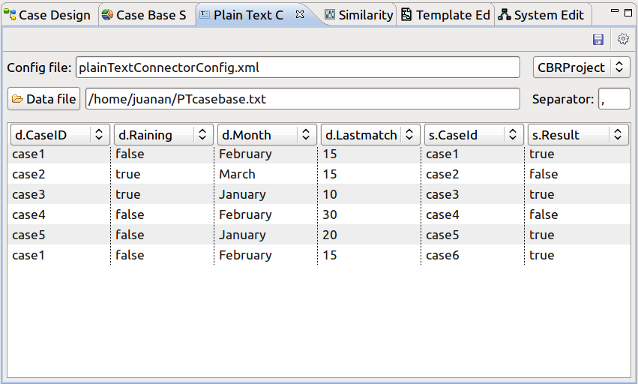
The tool allows to save the connector to an xml file and generate the source code that configures it in the application.
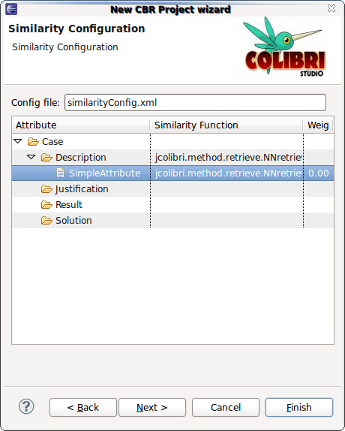
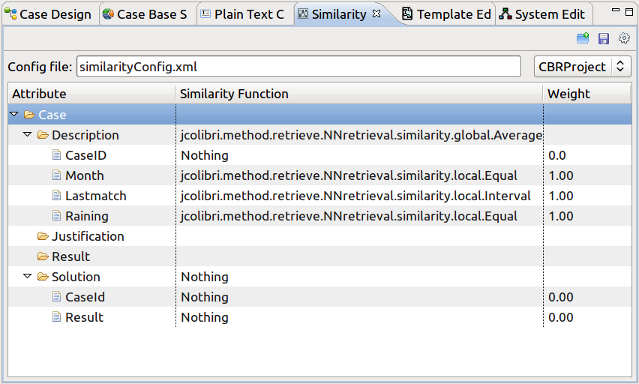
Similarity
Defines the similarity configuration of the CBR system. Note that some applications won't use this feature if they do not execute the Nearest-Neighbour algorithm.
Compound attributes are configured with a global similarity function, whereas simple attributes use local similarity functions. These functions are automatically obtained from the jCOLIBRI library. Read the jCOLIBRI tutorial for more information about similarity measures.
Install
COLIBRI Studio is composed of several plugins for the Eclipse IDE that provide the tools required to implement CBR systems. To install COLIBRI Studio you can download one of our preconfigured packages that include Eclipse and the COLIBRIStudio plugins (a Java VM must be installed in your system). Note that if you already have Eclipse installed in your system, you can install the plugins via Update Manager as described next.
Installing a preconfigured package that includes Eclipse+COLIBRIStudio+jCOLIBRI: Windows 64 bits download Linux 64 bits download
Installing COLIBRIStudio+jCOLIBRI through Eclipse's Update Manager:
If there is not a preconfigured package for your Operative System or you already have Eclipse IDE in your system (version 3.5 Helios or newer), you can install Eclipse from the Eclipse's official web site, and then install the COLIBRI Studio plugins through the Update Manager:If you don't have Eclipse, download it (Eclipse for Java Developers) from the official web site. At least, version 3.5 Helios is required.
Launch Eclipse and open the Update Manager: Help >> Install New Software 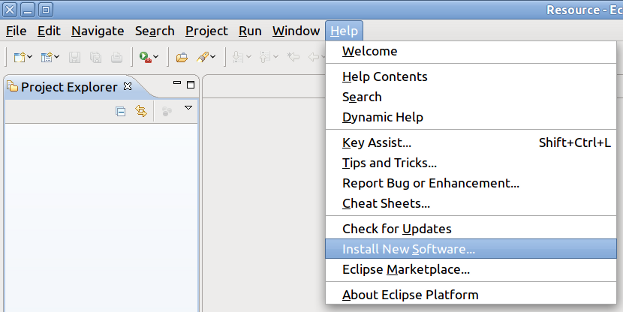
Select the Add button. We will add the COLIBRI Studio Update Web site that contains the latest version. Name it as "COLIBRI Studio", and type the following location: http://colibricbrstudio.net/update.
The COLIBRI Studio plugin will appear in the selection dialog. Select it and click Next.
Select again COLIBRStudio and click Next.
Accept the license agreement and click on Finish.
Installation will start automatically. Eclipse may warn you that the software you are installing contains "unsigned content". Click on OK to continue the installation process.
Once COLIBRI Studio has been installed, Eclipse will prompt you to either restart or apply changes to a running Eclipse. At this stage of the installation, you should click on Restart Now to restart your Eclipse instance. After a successful restart, COLIBRI Studio will be installed.
IMPORTANT: COLIBRI Studio tools are organized into an Eclipse's Perspective called COLIBRI. To open the COLIBRI perspective:
- Click on the Open Perspective icon located in the upper-right corner
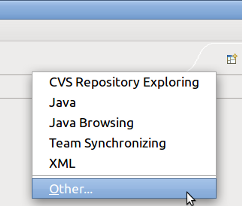
or - Select: Window >> Open Perspective
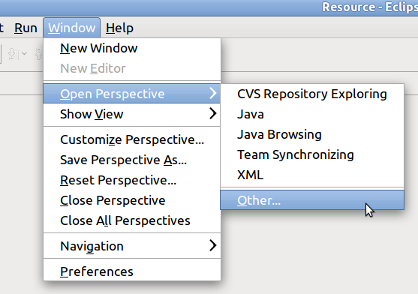
- Select Other
- A selection dialog will let you open the COLIBRI perspective: